EC2 instances, RDS database and many other resources reside in VPCs. To access them we need a network connectivity – either through a VPN, Direct Connect, or through a Jump / Bastion Host. That’s stating the obvious.
Sometimes, however, it’s inconvenient or difficult to achieve a direct connectivity ad-hoc – maybe you are in a location where your VPN is filtered, or from where the Bastion host Security Group won’t allow access but you still need access to the RDS for example.
ssm-tunnel comes to the rescue
ssm-tunnel makes a creative use of the AWS Systems Manager (SSM) Session protocol to tunnel IP traffic between your laptop and your VPC. It is even encrypted so we can call it a SSM VPN 🙂
The only requirements are:
- Linux EC2 instance registered in AWS Systems Managers (SSM) in the target VPC
- Linux laptop (or Linux VM if you’ve got Windows or Mac OSX laptop) with aws-ssm-tools package that provides the script
ssm-tunnelfrom pip and SSM Session Manager plugin installed.
To get started refer to my other post about ssm-session script. From now on I assume that you’ve got all the connectivity, SSM permissions, plugins, etc sorted. Also create a new Amazon Linux 2 EC2 instance, t3.nano is good enough and make sure you can successfully login to it with ssm-session some-instance.
TL;DR 🙂
(laptop) ~ $ sudo pip3 install aws-ssm-tools
(laptop) ~ $ ssm-tunnel some-instance --route 172.31.0.0/16
ssm-tunnel explained
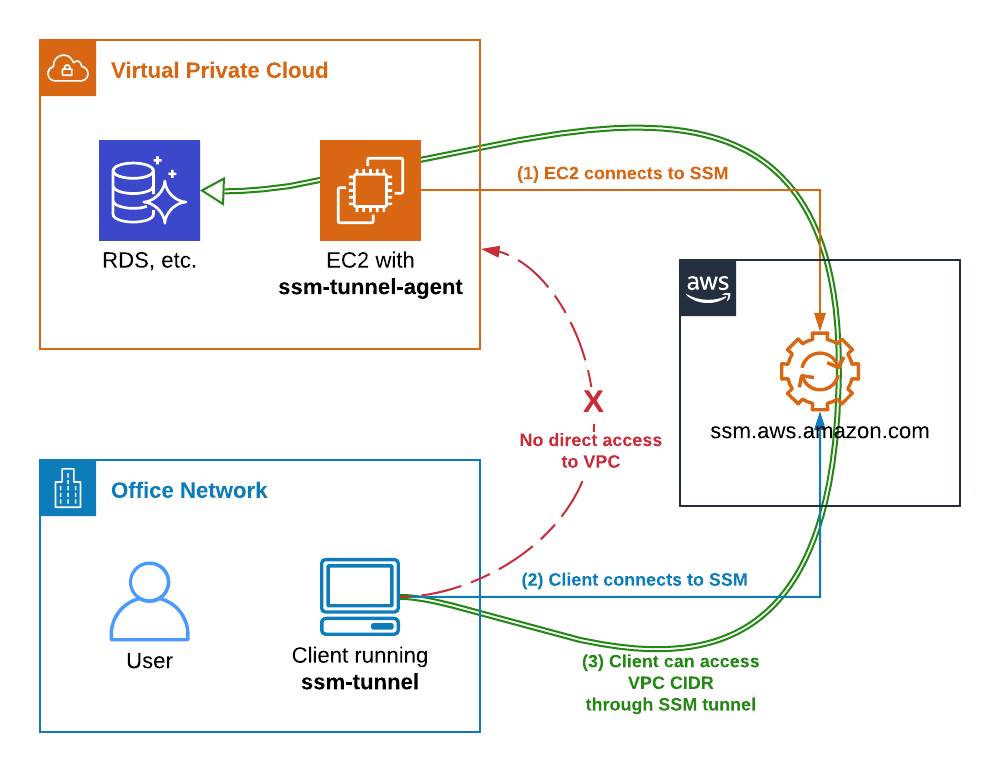
Here is how it works:
- EC2 instance connects to AWS SSM service and awaits instructions.
- On the laptop we start
ssm-tunnelthat also connects to AWS SSM service and requests a SSM Session to the instance. - ssm-tunnel starts
ssm-tunnel-agenton the EC2 instance. Both ends configure an IP tunnel, routing, packet forwarding, NAT and DNS to enable transparent access to the VPC address range. - Traffic starts passing through the tunnel and we can access any resource in the VPC, provided the Security Groups permit it of course.
Bring it up!
Here is how we start a SSM tunnel to a VPC through a brand new EC2 instance. At first it won’t work because the ssm-tunnel-agent isn’t installed.
(laptop) ~ $ ssm-session --list
i-0123456789   ip-172-31-21-30.compute.internal   some-instance   172.31.21.30

(laptop) ~ $ ssm-tunnel some-instance
[ssm-tunnel] ERROR: Unable to establish the tunnel!
[ssm-tunnel] ERROR: ssm-tunnel-agent: command not found on the target instance i-0123456789.
[ssm-tunnel] ERROR: Use 'ssm-session i-0123456789' and then run 'sudo pip install aws-ssm-tunnel-agent' to install it.
Let’s follow the instructions and install the agent. If python’s pip isn’t install it too. Use ssm-session to do the work.
(laptop) ~ $ ssm-session some-instance
Starting session with SessionId: botocore-session-1563416403

sh-4.2$ sudo pip install aws-ssm-tunnel-agent
sudo: pip: command not found

sh-4.2$ sudo yum install -y python-pip
...
Installed:
  python2-pip.noarch     0:9.0.3-1.amzn2.0.1

Complete!

sh-4.2$ sudo pip install aws-ssm-tunnel-agent
Collecting aws-ssm-tunnel-agent
  Downloading https://files.pythonhosted.org/packages/75/.../aws_ssm_tunnel_agent-0.9.6-py2.py3-none-any.whl
Installing collected packages: aws-ssm-tunnel-agent
Successfully installed aws-ssm-tunnel-agent-0.9.6

sh-4.2$ exit
Exiting session with sessionId: botocore-session-1563416403.
Ok, the agent is now installed and we should be able to start the tunnel. Assuming the VPC CIDR is 172.31.0.0/16 let’s run this command:
(laptop) ~ $ ssm-tunnel some-instance --route 172.31.0.0/16
[sudo] password for mludvig:
 00:02:04 | In:  312.0 B @    5.2 B/s | Out:    5.9kB @  121.3 B/s
Why does it ask for a sudo password you ask? Because it needs to configure a local tunnel network interface and routing – use --verbose to see the actual commands it runs.
If we look at the local interfaces on the laptop or VM we will see one named tunSSM.XXX.XXX with ip address from the range 100.64.0.0/16:
(laptop) ~ $ ip addr show
...
69: tunSSM.44.112: <POINTOPOINT,MULTICAST,NOARP,UP,LOWER_UP> mtu 1500 qdisc fq_codel state UP group default qlen 500
    link/none
    inet 100.64.44.112 peer 100.64.44.113/32 scope global tunSSM.44.112
       valid_lft forever preferred_lft forever
A similar interface has by now been created on the EC2 instance. Check it out with ssm-session if you like.
Now have a look at the local routing table:
(laptop) ~ $ ip route show | grep tunSSM
 172.31.0.0/8 via 100.64.44.113 dev tunSSM.44.112
 100.64.44.113 dev tunSSM.44.112 proto kernel scope link src 100.64.44.112
All the traffic for the VPC CIDR 172.31.0.0/16 will go out through the tunnel, that’s what we wanted.
The tunnel should now be set up.
Test it!
Traceroute to the VPC IGW is a good test…
(laptop) ~ $ sudo traceroute -I 172.31.0.1
 traceroute to 172.31.0.1 (172.31.0.1), 30 hops max, 60 byte packets
  1  100.64.44.113 (100.64.44.113)  85.552 ms  86.333 ms  85.460 ms
  2  * * *
  3  172.31.0.1 (172.31.0.1)  89.817 ms  88.356 ms  89.707 ms
Looks good!
Now you should be able to SSH to some other instance in the VPC or connect to an RDS if the security groups permit. More on this later.
EC2 instance and Security Groups
The remote agent automatically configures the instance as a tunnel endpoint.
- Creates tunSSM interface
- Enables packet forwarding
- Configures NAT of all the traffic from the tunnel to the VPC
The last point is important to understand – everything that comes out from the tunnel appears to come from the instance. That means that Security Groups and NACL rules apply! If for example your RDS only permits access from a certain EC2 instance you may not be able to connect to it through the tunnel! In other words – the SSM Tunnel instance must have access to the resources you want to connect to.
What about DNS?
What if we’ve got a VPC-private DNS zone that we need to resolve from the laptop, say vpc-only.example.com?
One option is to change the nameserver in /etc/resolv.conf to 172.31.0.2 (or whatever your VPC DNS is). That will however send all the DNS traffic over the tunnel, that’s not desirable.
A better option is to use the bundled ~/.local/bin/ssm-tunnel-updown.dns-example, copy it to ~/bin/ssm-tunnel-updown.dns-yourdomain and modify to your needs. Namely update the DNS_SERVERS and DNS_DOMAINS variables.
Also download and install the required update-systemd-resolved script from github. It makes use of systemd-resolved local resolver which is used by default in pretty much all modern Linux distributions and instructs it to resolve the domains specified in $DNS_DOMAINS using the nameservers from $DNS_SERVERS. Everything else will still be resolved through the default nameserver.
Now run ssm-tunnel with --up-down ~/bin/ssm-tunnel-updown.dns-yourdomain.
(laptop) ~ $ ssm-tunnel some-instance --route 172.31.0.0/16 \
                 --up-down ~/bin/ssm-tunnel-updown.dns-example
 <14>Jul 18 15:24:26 update-systemd-resolved: Link 'tunSSM.44.112' coming up
 <14>Jul 18 15:24:26 update-systemd-resolved: Adding IPv4 DNS Server 172.31.0.2
 <14>Jul 18 15:24:26 update-systemd-resolved: Adding DNS Routed Domain example.com
 <14>Jul 18 15:24:26 update-systemd-resolved: Adding DNS Routed Domain vpc-only.example.com
 00:52:28 | In:    3.1kB @    0.0 B/s | Out:   89.7kB @    0.0 B/s
Give it a try!
Now we’ve got a complete network access to the VPC, including DNS with very little setup needed. No VPNs, no bastion hosts, no public IPs.
It’s not particularly fast – my tests show around 40kB/s, but it’s certainly very convenient and easy to set up even for ad-hoc access.
Give it a try 🙂
Hi,
Thank you for this interesting blog.
But when I try to create a tunnel with the following command:
ssm-tunnel -v webfront_dev_instance –route 10.192.202.0/24
it fails with the following error:
Object “tuntap” is unknown, try “ip help”.
Executing: /usr/bin/sudo /sbin/ifconfig tunSSM.172.190 down
ifconfig: interface tunSSM.172.190 does not exist
Usage: ip link show [ DEVICE ]
ip link set dev DEVICE
[ { up | down } ]
[ address { LLADDR | factory | random } ]
[ mtu MTU ]
Object “tuntap” is unknown, try “ip help”.
[ssm-tunnel] INFO: Closing tunnel, please wait…
PS: I’m on mac os
Hi, unfortunately the
ssm-tunnelscript only works on Linux. I know some people usessm-tunnelunder Linux in VirtualBox.Hello Michael Ludvig,
Your explanation is amazing.
I have created ssm session manager in my private vpc with private link. Everything is working as expected but the logging with either S3 and cloudwatch for logging the session is not working. I greatly appreciate if you could explain how logging can be enabled for ssm session manager. Do i need to attach any specific inline policy for IAM ec2 instance roll.
Awaiting your response on the same.
Thank you.
Hi Arun
What do you want to log? I guess opening SSM Session will be logged at least in Cloud Trail (the IAM authentication part), not sure what else are you after?
hi arun how did you set up session manager with private link, secondly were you able to start session manager using the cli
Thank You very much for explaining ssm tunnel. SSM manages hybrid environments as well . I have instances not in aws but manage by SSM. Checking if you tried the same with hybrid instances as well
[vagrant@localhost ~]$ ssm-session mi-XXXX Traceback (most recent call last): File "/usr/local/bin/ssm-session", line 11, in sys.exit(main()) File "/usr/local/lib/python3.6/site-packages/ssm_tools/ssm_session_cli.py", line 84, in main instance_id = InstanceResolver(args).resolve_instance(args.INSTANCE) File "/usr/local/lib/python3.6/site-packages/ssm_tools/resolver.py", line 112, in resolve_instance items = self.get_list() File "/usr/local/lib/python3.6/site-packages/ssm_tools/resolver.py", line 42, in get_list assert content["ResourceType"] == "EC2Instance" AssertionErrorHi, no I haven’t tried with non-EC2 instances. Something to add to my TODO list…