Ethereum mining on AWS is now even easier with a ready to use template. Try it today because ETH mining may be over soon!

Photo by Kanchanara on Unsplash
The AWS Ethereum Miner project has been around for over a year now and has seen a great interest from the miners during this time. With the looming end of Ethereum mining — aka ETH 2.0 or “the merge” (see below) — it no longer makes sense to invest in buying GPUs and mining rigs. There simply isn’t enough time to pay them off.
AWS mining still offers an attractive alternative thanks to their no upfront payment pricing model. In this post I’ll guide you step by step on your journey to the cloud mining.
What is AWS Ethereum Miner
- Easy to use CloudFormation template that spins up the most cost effective EC2 instances and starts the mining program.
TL;DR — Visit the project GitHub and scroll down for the table with 1-click deployment links: https://github.com/mludvig/aws-ethereum-miner - Support for all relevant AWS GPU instances:
- Standard Nvidia ones like g5., p3., g4dn.*
- Superfast p4d.24xlarge that can mine at 1.35GH/s
- AMD Radeon based g4ad.*
- The new Graviton2 CPU + Nvidia GPU g5g.*
Some old, slow instances are no longer supported, e.g. p2.* or g3.* as their performance is laughable.
- Optimised AMIs with the new CUDA 11.6 that are far smaller than the Amazon’s Deep Learning AMIs. The size of course matters, even though us males don’t like to hear it :)
Mining is all about efficiency and paying for 150GB storage with lots of unneeded tools vs paying for a lean 10GB custom image makes a difference.
Overview of the mining process
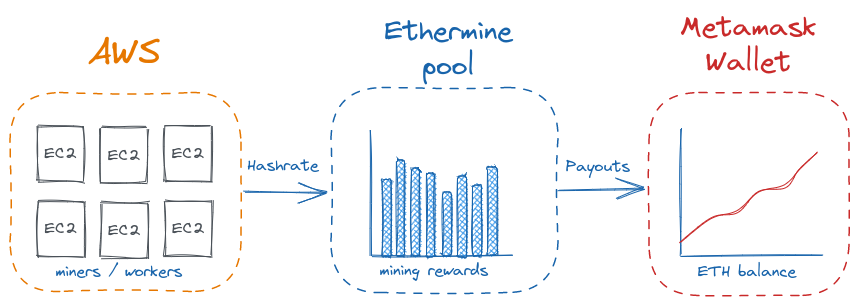
Overview of the mining process
- The GPU instances, aka miners or workers, receive jobs from the Ethermine pool and submit the solutions (“shares”). The performance of each instance is calculated in MH/s (mega hashes per second).
- The Ethermine pool keeps track of all the shares submitted by your workers. Each submitted share receives a small reward — a fraction of ETH. The amount is not constant and depends on the current pool hashrate, the network difficulty, the current gas price, the number of transactions in the mined block, and some other factors.
- When you have enough rewards accumulated in Ethermine you can request a Payout to your wallet. The minimum amount is 0.005 ETH (at the moment ca $10) and it can be paid out either over the Ethereum Mainnet — the “native Ethereum” — where you have to pay a small transaction fee (right now ca $0.80) or you can be paid out in so called Wrapped Ether (WETH) on the Polygon network and that is free.
There are pros and cons for each method — if you just want to HODL your ETH you will probably want to stick to the Mainnet. If you’re itching to give some Web3 or DeFi projects a go you may want to go with Polygon+WETH for its lower fees.
In the end you can always convert between ETH and WETH so it’s not a big deal if you change your mind.
The bottom line is that the more and faster workers you run the more shares you solve and the more ETH you receive.
Ethereum mining on AWS in a few easy steps
With the theory and terminology laid out we can finally get technical.
To get started you will need two things …
1. MetaMask — your Ethereum wallet

Mining rewards are sent to an Ethereum wallet address that you provide during the CFN stack creation. The address is a long hexadecimal number, something like 0x1234567890…ABCD9876.
If you don’t already have an Ethereum wallet I suggest that you check out MetaMask — it’s a browser extension that offers a number of useful features:
- It’s a non-custodial wallet, which means that you and only you know the keys. Remember: not your keys, not your crypto.
- Supports both the Ethereum Mainnet and the Polygon network. That’s very useful for getting free payouts from the Ethermine pool as explained above.
- Supports “Web3” integrations where the websites identify users through their wallet addresses. If you are planning to explore the numerous DeFi (decentralised finance) sites, DAPPS (distributed apps) or other blockchain-related applications you will find that MetaMask is at the moment a must have plugin.
- With MetaMask you can conveniently configure the Ethermine pool payouts — the thresholds, the network, the maximum fee, request manual payouts, etc.
Once you’ve got MetaMask installed and the recovery phrase backed up check out the center-top of the pop-up window for the wallet address. This address doesn’t have to be kept secret, unlike the recovery phrase.
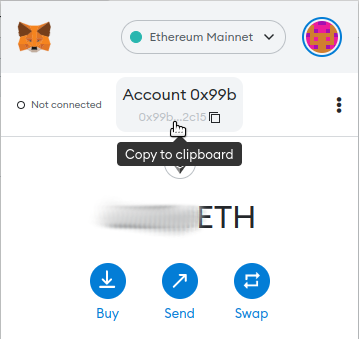
Metamask — copy account address
You don’t have to use MetaMask of course. If you already have an existing wallet you may want to use that. Just be aware that some wallets may not support Polygon so be careful not to send the payouts somewhere where they can’t be accessed.
2. AWS account with high enough “service quotas” for GPU instances
Obviously you will need an AWS account to mine in. However there is a catch — new AWS accounts are created with 0 (zero) “service limit quotas” for GPU instances which means that you can’t start any unless you get the limits increased. Older AWS accounts may already have the limits set to 64 vCPU in some regions — check it out, you may be lucky!
To view your current quotas use the tools/list-quotas.sh script. You can run it for example from the AWS CloudShell (see below).
aws-ethereum-miner $ tools/list-quotas.sh
               |  G4*/G5* types |  P3*/P4* types
Region         | OnDemand  Spot | OnDemand  Spot
---------------+----------------+---------------
ap-northeast-1 |      640   640 |       64    64
ap-northeast-2 |       64    64 |       64    64
ap-northeast-3 |        0     0 |        0     0
...
us-west-1      |      768   640 |      692   640
us-west-2      |      768   640 |      692   640
If some of your regions have high limits you’re lucky and you can start mining. However if all the regions show 0 you will have to request a quota increase using the tools/increase-quotas.sh script, or through the console — look for “All G and VT Spot” and “All P Spot Instance Requests” in your desired regions. However note that the demand for GPU instances is high and AWS Support can be slow to approve the limit increases. In that case you may want to try a different (older) account if you’ve got access to one.

Start the miners!
Now that you’ve got the wallet address and the AWS account sorted we can finally start the miners.
The easiest way is by following the below links to create the CloudFormation stack in one of the more popular regions with the most efficient instance types available.
- us-east-1 (N. Virginia)
- us-east-2 (Ohio)
- us-west-2 (Oregon)
- eu-west-1 (Ireland)
- eu-west-2 (London)
- eu-central-1 (Frankfurt)
- ca-central-1 (Canada)
- ap-northeast-1 (Tokyo)
- ap-northeast-2 (Seoul)
- ap-southeast-1 (Singapore)
Quick links for all the other regions are in the GitHub README file.
Before the stack is created and the mining instances started you’ll be asked a number of questions. The defaults are usually fine but make sure that you change wallet address, the required hashrate and whether to use just spot instances, on-demand instances or both. If you prefer speed of mining over the cost efficiency you may want to use “both” as spot instances are sometimes on short supply. For most people “spot” is the preferred option.
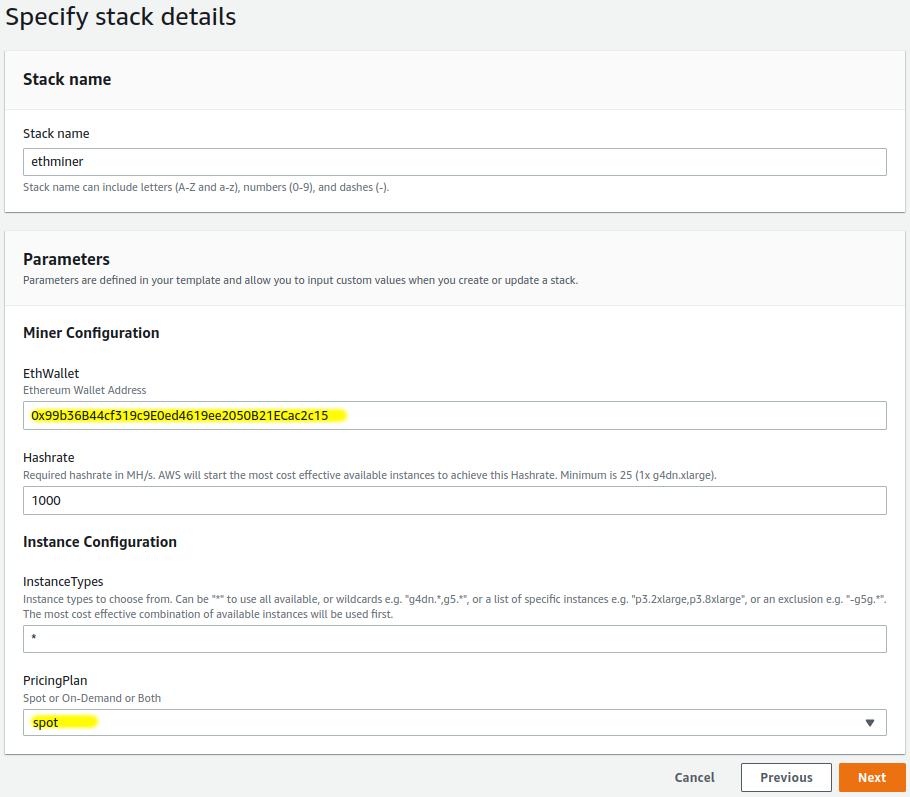
Specify the stack details in CloudFormation
Deploy in all the regions with AWS CLI
Alternatively you can create the CFN stack from a command line. The following snippet will deploy the stack in all the available regions. Don’t forget to change the wallet address (unless you want to mine into my wallet of course! :)
# Create AWS Ethereum Miner in all available regions
# See https://github.com/mludvig/aws-ethereum-miner

ETH_WALLET=0x99b36B44cf319c9E0ed4619ee2050B21ECac2c15
HASHRATE=1000     # Desired hashrate in MH/s, i.e. 1000 = 1 GH/s

REGIONS=$(aws ec2 describe-regions --query 'Regions[].RegionName' --output text)
for REGION in ${REGIONS}; do
  echo "== ${REGION} =="
  aws --region ${REGION} cloudformation create-stack \
    --stack-name ethminer --capabilities CAPABILITY_IAM \
    --template-url https://s3.us-west-2.amazonaws.com/cnl4uehyq6/ethminer/template-eth-default-vpc.yml \
    --parameters ParameterKey=EthWallet,ParameterValue=${ETH_WALLET} \
                 ParameterKey=PricingPlan,ParameterValue=spot \
                 ParameterKey=Hashrate,ParameterValue=${HASHRATE}
done
The CLI commands can be easily run from the AWS Cloud Shell if you don’t have the AWS CLI configured on your laptop.
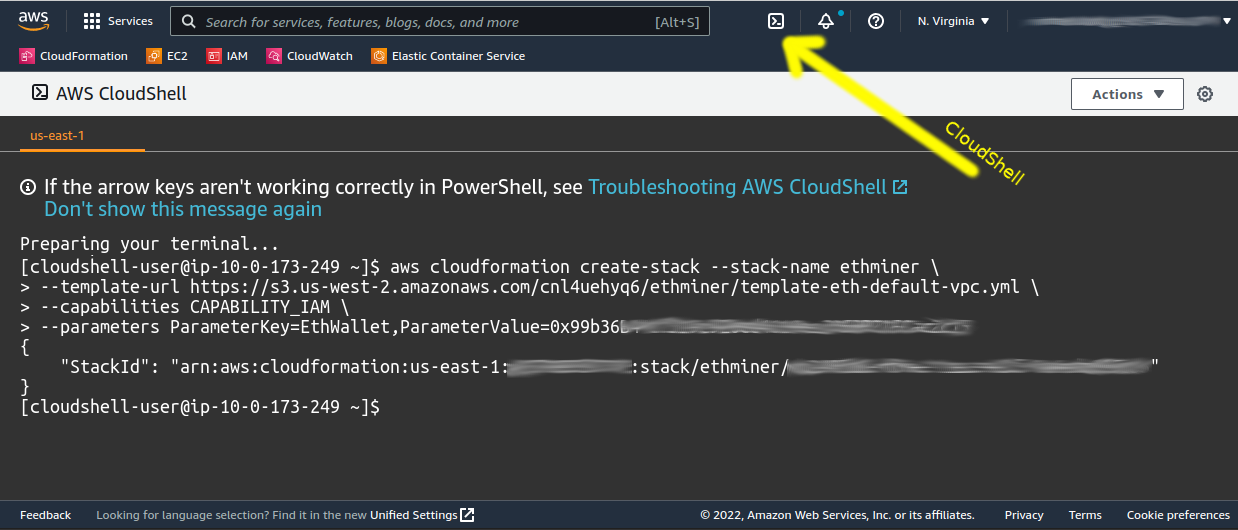
AWS Cloud Shell
Monitor your mining
Once the stack is created navigate to its Outputs to find the link to your Ethermine dashboard. Or go to the Ethermine.org portal and enter your wallet address in the search box. You don’t have to register with Ethermine, it keeps track of your earnings as soon you start mining into a new address and pays out as soon as you reach the payout threshold. You can configure the threshold and other parameters in the Settings tab on your wallet Ethermine dashboard.
Be patient — the miner stats may take around 15 to 20 minutes to appear and another hour or more to ramp up. You should mine for at least 6 to 12 hours to see some meaningful results.
Note that the workers are grouped by regions. You won’t see the individual EC2 instances but rather all the combined hash-power from each region. That’s normal and expected!
The future of ETH mining (… is bleak)
Well, this is a controversial topic. At the moment we can mine ETH because Ethereum is a Proof of Work blockchain — miners do the hard work and are rewarded with ETH for doing it. However for many reasons the blockchain is going to switch to Proof of Stake later this year and that will be the end of mining as we know it.
The switch from PoW to PoS is called “the merge” or ETH 2.0. It was supposed to happen last year, then it was postponed to early this year, then again to June, and now it looks more like August or September this year. More likely than not it will happen sometime later this year and that will mark the end of Ethereum mining, whether on GPUs or on AWS or anywhere else. The end. Finish. No more mining.
Worse yet, even before “the merge” there are plans to make mining gradually less profitable by artificially increasing the network difficulty roughly every 2 weeks — the so called “difficulty bomb”. One guy on Reddit created the following forecast. It may not be 100% accurate with the dates but it certainly shows the likely trend.
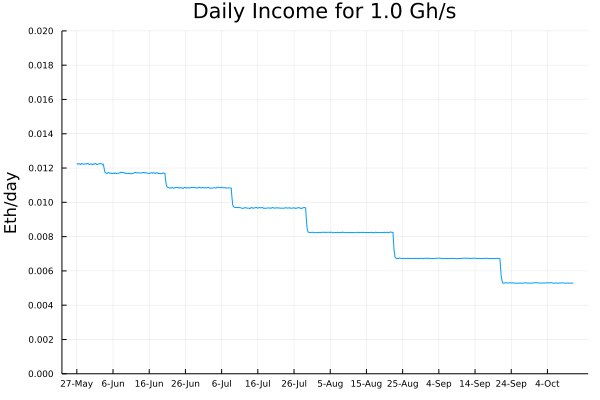
ETH mining rewards prediction with consideration to the “difficulty bomb”
The bottom line? If you want to mine Ethereum on AWS do it NOW. Delay and procrastinate and you’ll get gradually lower rewards. Delay some more and you’ll be done over by “the merge”.
Subscribe to the AWS Ethereum Miner mailing list to stay up to date.
Happy mining! ;-)
Also check out my previous posts on this topic. Some prices and profitability calculations are now out of date but you can still find a lot of useful background information in there!
New AWS instance that makes ETH mining profitable
Mining Ethereum on AWS so far made no sense. Until now! One new AWS instance is the game changer and mining on AWS is…
Mining Bitcoin and other crypto on AWS
The Bitcoin mania has struck again. Take part in the frenzy and start mining crypto on AWS using a complete working…